Although the String Art Fun patterns only give instructions for using nails in wood, the designs can be stitched on to card with embroidery floss. String Art Fun customer Marge Burns sent us this picture made from the free shell pattern. The pattern was used at full size and Marge has added gems.

Working out the technique for stitching.
The String Art Fun patterns only give instructions for stringing them with nails hammered into wood. To use holes pricked in card the stringing sequence needs to be modified. When using nails the string goes around the nail and foreword to the next nail. When sewing the string comes out of the first hole and into the second hole. It then comes out of another hole, usually the one next to, or near, the hole it has gone into.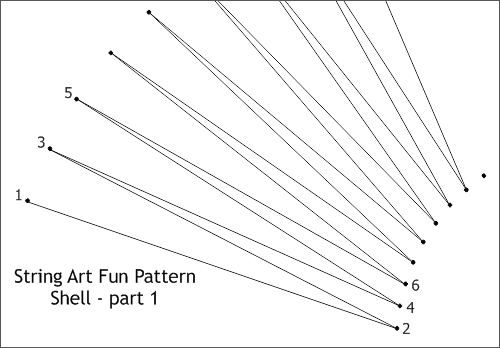
The shell pattern using nails in wood.
1 – 2, 2 – 3, 3 – 4, 4 – 5, 5 – 6.
Continue this sequence until the shell is complete using the illustration as a guide.
The modified sequence for stitching the shell on card.
Out at 2 in at 1.
Out at 3 in at 2.
Out at 4 in at 3.
Out at 5 in at 4.
Continue this sequence until the shell is complete using the illustration as a guide.
Stitching a circle.
When stitching a circular shape the stringing sequence might be modified as follows:
Circle pattern using nails in wood.
5 – 60, 60 – 35, 35 – 10, 10 – 65, 65 – 40.
Continue this sequence until the section is complete using the illustration as a guide.
Modified sequence for stitching the circle on card.
Out at 5 in at 60.
Out at 65 in at 10.
Out at 15 in at 70.
Continue this sequence until the section is complete using the illustration as a guide.
Stitching other shapes.
For other shapes study the pattern and if there is a sequence, work out how it could flow forward with stitching.